Example: Reputation watchdog
This guide walks through an example agent that uses Meltwater MCP as one governed source of external signal, joined with your own first-party data - to produce an insight neither could alone.
The agent runs a brand reputation scan: it compares coverage in a window to the roughly 30-day norm, flags an anomaly, cross-references your own internal systems for the same signal, and drafts a fused alert. The join happens in your agent - and that fusion of external and internal signal is the thing the Meltwater application alone cannot do.
The worked example reproduces a real event: the May 2026 Toyota Tundra recall re-escalation.
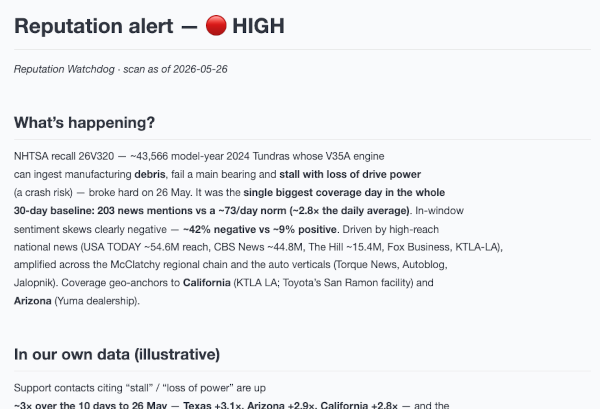
The full example lives on GitHub: meltwater-api-examples/meltwater-mcp/reputation-watchdog. This guide summarises what it does and how to run it; the repository README has the complete spec.
What it does
The agent scans Meltwater for an anomaly, then pulls the matching signal from your own systems and fuses both into one alert:
| Step | Source / tool | What it gets |
|---|---|---|
| Resolve search | a saved-search list tool | Proposes the best-matching saved search - grounds on the configured ID |
| Volume vs norm | unified_retrieval_statistics_retrieval_tool (count by day) | Anomaly-window volume vs the ~30-day baseline - the anomaly and its severity |
| Sentiment | unified_retrieval_statistics_retrieval_tool (sentiment breakdown) | Negative / neutral / positive split |
| Top sources | unified_retrieval_statistics_retrieval_tool (top sources) | Who is driving and amplifying it |
| Headlines | unified_retrieval_document_retrieval_tool (sortBy reach) | The key articles in-window |
| First-party fusion | your own source (a mock support desk here) | The same signal in your internal data, by region |
The scan grounds on a Meltwater saved search (query:"*") - your curated search is the authority on relevance and gives a cleaner dataset than an ad-hoc query. (No saved search yet? The agent falls back to unified_retrieval_query_gen_tool on the topic name.) It then calls your first-party source and reasons across both to draft the alert, setting the status honestly from the data - HIGH / MEDIUM for a real anomaly, or ALL CLEAR on a quiet day.
The fusion architecture
   reputation_watchdog.py  (your agent, your infra)
        ├── Meltwater MCP (v2)      → external signal (governed + metered)
        ├── your first-party source → your own data (the bundled mock stands in for it)
        └── Anthropic SDK (LLM)     → reasons across both → drafts the alert
Both sources are attached as client-side MCP clients - your process holds the connections and executes the tool calls (via the Anthropic SDK tool runner). That is what lets the agent reach a private internal source without exposing it to the public internet, and it is how you would wire in your real systems.
The server-side MCP connector is the right choice for public-only data, but it cannot reach a private source - the model provider's servers would have to dial into your network. Attaching your internal source as a client-side MCP client keeps it inside your own process, so a private or internal URL (localhost, a VPC address) is reachable and nothing is exposed publicly.
Anchoring the scan: the --as-of date
The watchdog compares a 24-hour window to the roughly 30-day norm, so on a quiet day there is nothing anomalous to show. Pass --as-of YYYY-MM-DD (or set asOf in the watch config) to anchor the scan to a specific day: the "last 24h" becomes the 24 hours of that day, and the baseline the 30 days before it. The default is today (real-time).
This is a real capability - backfilling a missed run, replaying an incident, or investigating a past event - not just a demo trick. The windows are computed in code (no fuzzy model date arithmetic), and the alert labels the as-of date, so a backdated run is never mistaken for live.
Ways to run it
- In Claude Code (no code) - quickest. Let Claude Code act as the agent using your connected Meltwater MCP server plus the bundled mock source. This is the best way to get a first look - see
RUNNING-IN-CLAUDE-CODE.mdin the repo. - Standalone (this repo).
reputation_watchdog.pyruns entirely in your own process using the Anthropic SDK and the MCP client. This is the schedulable path you would deploy to cron, a Lambda, or Cloud Run.
What you'll need
For a standalone run you need two credentials, both supplied through the environment (the code never hardcodes a key):
- An Anthropic API key - the agent's reasoning. Create one at console.anthropic.com (Settings → API Keys) and set
ANTHROPIC_API_KEY. - A Meltwater API token - access to your Meltwater data. Set
MELTWATER_API_TOKEN. See API Credentials if you need to create one, and Connecting to Meltwater MCP for how the token is used to authenticate against the MCP endpoint.
Meltwater authentication is a single seam in the code: set the token and it runs end-to-end. When Meltwater's per-user OAuth clients are available, you swap the static token for an OAuth credential - same code, different credential.
The agent calls the live Meltwater MCP server, so you need Meltwater MCP in your subscription. The exact tools available depend on the products in your package. See the Overview or talk to your account team.
Quickstart (standalone)
From the reputation-watchdog directory:
uv sync                                                # install deps (anthropic[mcp], python-dotenv, mcp)
cp .env.example .env                                   # add ANTHROPIC_API_KEY and MELTWATER_API_TOKEN
uv run python mock_firstparty/server.py &              # start the mock first-party source (localhost)
uv run python reputation_watchdog.py --watch watches/example-watch.json --out brief.md
Anchor the scan to a specific day (to backfill, replay, or demo with a known event):
uv run python reputation_watchdog.py --watch watches/example-watch.json --as-of 2026-05-26
The alert is written to --out (default brief.md) and printed to the console. The repo's sample_output/brief.md shows what a real anomaly run looks like. To run it headless, add a delivery step - post to your channel, email it, or drop it on a file host.
Make it your watch
Everything specific lives in one JSON file - fork watches/example-watch.json:
name/brand- the subject of the scan.savedSearch.id- your Meltwater saved-search ID (the relevance authority; queried withquery:"*").firstParty- a connector to your real internal system (CRM, support desk, claims). The bundled mock stands in for it.regions- where to look for external and internal agreement.windowHours/baselineDays/asOf- the anomaly window, baseline, and optional anchor date.
Point the agent at your copy with --watch path/to/watch.json (or the WATCH_CONFIG environment variable).
The mock support-desk server is a stand-in so the example runs end-to-end with no customer data and no PII. To make it real, point firstParty at your own internal MCP endpoint (or wire in a plain function tool) that returns the same shape of signal. Because it runs client-side in your process, your internal source is never exposed publicly.
What's next
A few natural extensions, sketched in the repo but not built:
- Swap the mock for your real system - an internal MCP endpoint or a plain function tool.
- Expose it as a sub-agent. This runs as a dedicated agent with Meltwater as its primary source, fused with your data in-process. The same scan logic could instead be exposed as a reputation sub-agent your broader orchestrator calls - the pattern shown in the Social insight sub-agent example.
- Act, don't just alert - add a step that drafts a holding statement or opens a ticket.
Getting help
If you have any questions, take a look at the FAQs page. If you need further help, please reach out to our Support team.